How to Screen Share on Facebook Live
Facebook Live now has built in screen sharing that can be used from your desktop. Until now, the only way to share your screen during a live broadcast was to use a third party app. Now we can do it right from Facebook, and it works on personal profiles, pages, groups, and events. Although it does have some limitations, it’s extremely easy to use, and since it’s built in to Facebook, there’s no added cost. In this post, I’ll show you how to use the new Facebook screen sharing feature, and talk a little about some of the pros and cons.
At this point, the new screen sharing option only works on the desktop app, on Chrome. And, the first time you use it, you’ll be prompted to install the Facebook Screen Sharing Chrome extension on your browser.
Select Live Video
You can either go directly to the location you’d like the broadcast to appear (profile, page, group, or event) or start from your personal profile. I normally go right where I want the broadcast to appear, but in the images below I’ll show how to set it up from your profile. (Note: this does not necessarily mean the live broadcast will be shown on your profile. It’s just a starting point.)
The screenshot below shows a status update on my personal profile. When I click on ‘Live Video’ it will bring up another screen that allows me to select more broadcast options.

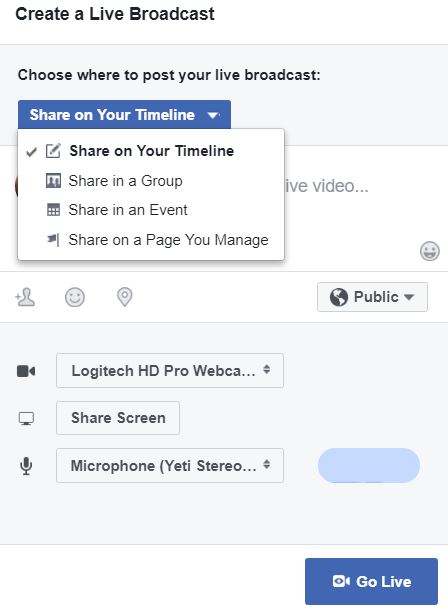
Choose Broadcast Options
When starting from my personal profile, the default location is ‘Share on Your Timeline.’ Wherever you start from, that will be the default. For example, if I am on a page, the dropdown will have that page selected as the default. The same is true for a page, group, or event. Just be sure to double check the dropdown to make sure your broadcast is going where you want it to go!
You’ll have the option to share your screen or use the camera. The camera is used by default, but if you want to share your screen, just click the ‘Share Screen’ button. It’s important to know that you can do one or the other for the entire broadcast. You cannot switch from one to the other while you’re live. Keep in mind that when you’re live, you will see ‘End Screen Share’ at the bottom of your screen. If you click it, you will end the entire broadcast; not just the screen sharing!
If you have more than one camera and mic available, you can select which ones you want to use.
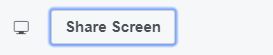
When you click the ‘Share Screen’ button will, it will have a darker blue outline, like this, then a new window will pop up with screen sharing options.
You can share your entire screen, a Chrome tab, or an app window. Whichever one you select, it will be the one you will use for the entire broadcast. When you’ve selected what you want to share, click ‘Share’ in the bottom right to preview. If you share anything other than your desktop, it will open that tab or application window. You’ll then have to go back to the Facebook tab to start the broadcast. For this reason, if you’re sharing something on Chrome, it’s best to have two separate Chrome windows open, rather than two tabs in the same window.

Once you’re ready to start your Facebook Live broadcast, click ‘Share’ and you’ll be taken back to the broadcast window. If it all looks correct, click the ‘Go Live’ button and you will be sharing your screen with your viewers.
Pros and Cons of Facebook Live Screen Sharing
I’ve used the new Facebook screen sharing a few times, and it has been a bit glitchy. I did one broadcast showing how to use the new feature, but my video went a little wonky and wouldn’t show all my screenshots. Unfortunately, I didn’t realize it until I watched the replay. For now, I’ll probably stick with third party apps BeLive.tv and OBS (Open Broadcaster Software). But I’m excited to see how the built in Facebook screen sharing will evolve. As with any other new Facebook features, I expect we will see improvements over time.
Here are a few of the pros/cons I’ve noticed so far. Hopefully it won’t be long though, before these things are addressed.
Pros
- No need to use third party apps.
- It’s easy to use.
- It’s built into Facebook, and it’s free.
- Less lag time than third party apps.
Cons
- Cannot switch between camera and screen sharing.
- No fixed logo or graphic overlays. Other apps have the option of including your logo, or other graphics to appear on screen. Facebook does not.
- No lower thirds. Lower thirds are the graphics and crawlers you see across the bottom of videos.
- No picture in picture mode. When sharing your screen, you don’t have the option to have a small video of yourself in part of the window.
- Videos quality isn’t the greatest.
Have you tried the new Facebook Live built in screen sharing feature yet? What do you think? Do you think you’ll start using it?
I used it and when done it was hard to find it (group). I found in media, and later in the feed or board. But it didn’t share my screen. I thought maybe I missed some step, but now seeing your further notes I think it just didn’t do its job. Cos I definitely chose screenshare and ‘share’. Although it was hard to read the bottom of the screen while setting up, it wouldn’t rise so i could see better. Did you say it only works in Chrome??
When you select screen share, is there a way to share the computer audio rather than a microphone? I want to stream a previously recorded concert.
All the step works. But after clicking the Go Live, it appears “Unable to start Live video. Check your setting and try again?”
So how do I fix this?
Facebook has been extremely glitchy lately! I just tried going live with Facebook Producer and got the same error you saw. I didn’t see any obvious way to fix it. A lot of people who go live regularly use apps like Streamyard and Belive.tv. Going live with either of those seems to be more reliable than using FB Producer. To use either of them you’ll connect to Facebook, just follow the prompts with either of them to get set up. Both of them offer a free version.
Hi Therese, thank you so much for mentioning BeLive! A lot has changed as well, and we added tons of new features, such as the ability to stream in 1080p and simulcasting to YouTube and Facebook. 🙂
My laptop can’t screen share it says ” if you’re experiencing an issu screen sharing a single chrome tab, try sharing your entire screen instead” pls help thank you
Hi, Can you still have audio of someone talking over the screen share? (planning on doing a live stream of a software tutorial and want to talk through the livestream)
You should be able to, just remember you’ll have to start out with screen sharing. (You can’t switch between screen sharing and video) Having said that though, Facebook has been extremely glitchy these days. Some things work for some but not for others. I’d do a quick test of this before your actual tutorial.
Hi, was using Facebook Live and in order to show my face I was using zoom (free version with just myself in a meeting) or wondershare filmora (record PC screen) or also loom (Cam only). But from last week even if I select share screen on Facebook Live, I am not able to use the camera with the other applications which tell me there is an issue with the camera. But if I start those programs first the camera is not an issue, but Facebook Live share screen does not work and reports me the the camera has a problem. Is there something I can do to solve this? I went live the last 8 weeks using any of the previous programs and all went well. Now I can’t do so. Can you help me?
hola
desde hace 3 días no me funciona más compartir la pantalla con facebook live. no me queda clara la razón aparentemente me pide que actualice chrome, pero está actualizado
(Estoy usando el traductor de Google para esto. ¡Espero que sea exacto!)
¿Estás seleccionando la opción de compartir antes de lanzarlo? Durante un Facebook en vivo, puedes hacerlo en vivo con la cámara o compartir la pantalla. No puede cambiar de uno a otro durante el video en vivo.
Si está seleccionando compartir pantalla antes de lanzarlo, y todavía no funciona, lo más probable es que sea un error de Facebook. Tiende a ser un poco irregular.
Are you selecting the share option before going live? During a Facebook live you can either go live with the camera or sharing the screen. You cannot switch from one to the other during the live video.
If you are selecting share screen before going live, and it still isn’t working, it’s most likely a Facebook glitch. It tends to be a bit glitchy.
Help! So very new to this but if I have a iPad and a iPhone, can I still be able to use the feature of sharing my screen when I do a FB live? Or do I need to have google chrome? Or is it best to use the third party app?
You’d need to use the iPad as an additional camera, using a third party app such as Ecamm for Mac or Switcher Studio. You might also try using the web version rather than the app. I’m not sure if that would work very well or not on an iPad or iPhone, but it’s worth a try.
These instructions were very helpful! Thanks! I just had a question I was hoping you could help with. I did facebook live and shared my screen of a music video I had located on Youtube. I got a message that UMG was blocking my video but the video did show up on my facebook timeline. I wasn’t sure what to do so I deleted the live video post from my facebook timeline. Is there a better, legal way to show existing music videos on facebook live without having the copywrite infringements?
Far’s I know it’s not a problem to post clips for the purpose of discussing what’s in the film/ video etc. And screenshots.
Really helpful tips and chat – certainly will investigate BeLive.tv, thank you!
Thank you! You are the first place I have found that explains that FB Live doesn’t let me shift between the Live Camera and the shared on-screen video. I was so frustrated and embarrassed today when my planned presentation did not work. Thanks for your clear explanation. Now I can troubleshoot my presentation. BTW, FB kept trying to get me to use Live Producer which was worse for my purposes, but they said FB Live was going away?
Hi Amy, I’m glad that was helpful, but I’m so sorry to hear your presentation didn’t go well!
I’ve tried using the new Live Producer a few times, but it hasn’t worked for me. I’m not sure when they plan on forcing us to use it. I do wish they would just leave things alone at least until we get through this pandemic.
Hi Therese,
If I use BeLive.tv can I share my screen after I have started if I have not set it up prior
Yes, you can switch between sharing your screen and then back to the camera.
Hi Therese,
I am not very technical! Am planning to use FB live for my new book club but i want to be able to use camera & share. I don’t know what us meant by ‘adding an extension’ ie Be Live.tv. Can you explain please? Thanks
Hi Pam, you can share your screen on Facebook Live, without using BeLive. But, you need to decide before you go live that you want to either use the camera or share your screen. And, while you’re live, you cannot switch to the camera.
With BeLive you can go live with the camera and then share your screen while you’re live – and you can go back and forth. BeLive is a third party app that works with Facebook. When you first sign up for BeLive it will ask to connect to your Facebook account. When you go live, you’ll go to BeLive.tv, choose the page, group, or profile where you want to go live and can then do a live broadcast right from BeLive. They offer a free plan so you can try it out.
Why doesn’t my facebook give me the option to screen share when I do Go Live? Is there a special version I have to download? I already downloaded the screen sharing extension on Chrome.
You should be able to choose camera or screen before you go live.
When I screen share through Facebook Messenger the other person can see my screen but can’t hear anything. Help!!!
Have they updated this yet, to allow for switching between screen sharing and the Camera? This is 2020, hoping it has been updated.
Unfortunately, no. You still have to decide before you go live. I rarely go live using Facebook. Instead, I use BeLive.tv, which you connect to your FB account. It’s pretty easy to use.
So with BeLive.tv, is it able to share screen and overlay me webcam? Wanted to share my screen with my webcam overlaying at the bottom corner of the screen
Yes.
Thank you for this tips. We should have read this before our Director did the Facebook live awhile ago. I think be.live will be useful to us. I will ask him to sign up and see if it will definitely help on our next facebook live events
This person has totally ripped off your article as his own on Quora! (Is it naive of me to be so outraged?) https://www.quora.com/How-can-I-share-my-screen-on-Facebook-live Thanks for the great tips.
Thank you!! Maybe not naive, but still extremely irritating. If people reprint my stuff and give me credit that’s one thing, but posting it as their own pisses me off. I’ve submitted a copyright infringement report to Quora.
I tried using the Facebook Screen Share today for a FB Live Broadcast. Everything worked as detailed above by you. When I pressed the Go Live button it said I was broadcasting Live. But I could not find my Live feed anywhere on Facebook. I think I will try a 3rd party package next.
Is this it? I found it on your feed and on the videos tab.
https://www.facebook.com/483133745044183/videos/643974589385633/
If you haven’t looked at it yet, you may want to try BeLive.tv. I use that for almost all my FB Lives.